

Join us November 7th at 2pm EST for the Circuit Sculpture workshop, part of Hackaday’s Remoticon. I’ll be co-presenting Mohit Bhoite and Jiri Praus.
https://hackaday.io/project/175173-remoticon-circuit-sculpture-workshop
hackaday
Hackaday Superconference 2019 /
It was an honor to speak at the 2019 Hackaday Superconference. What an amazing group of hardware enthusiasts! Thank you, Hackaday #supercon
Hackaday Superconference /

I’m excited to be a speaker at this year’s Hackaday Superconference in Pasadena, CA during November 15-17th.
Moth bus /


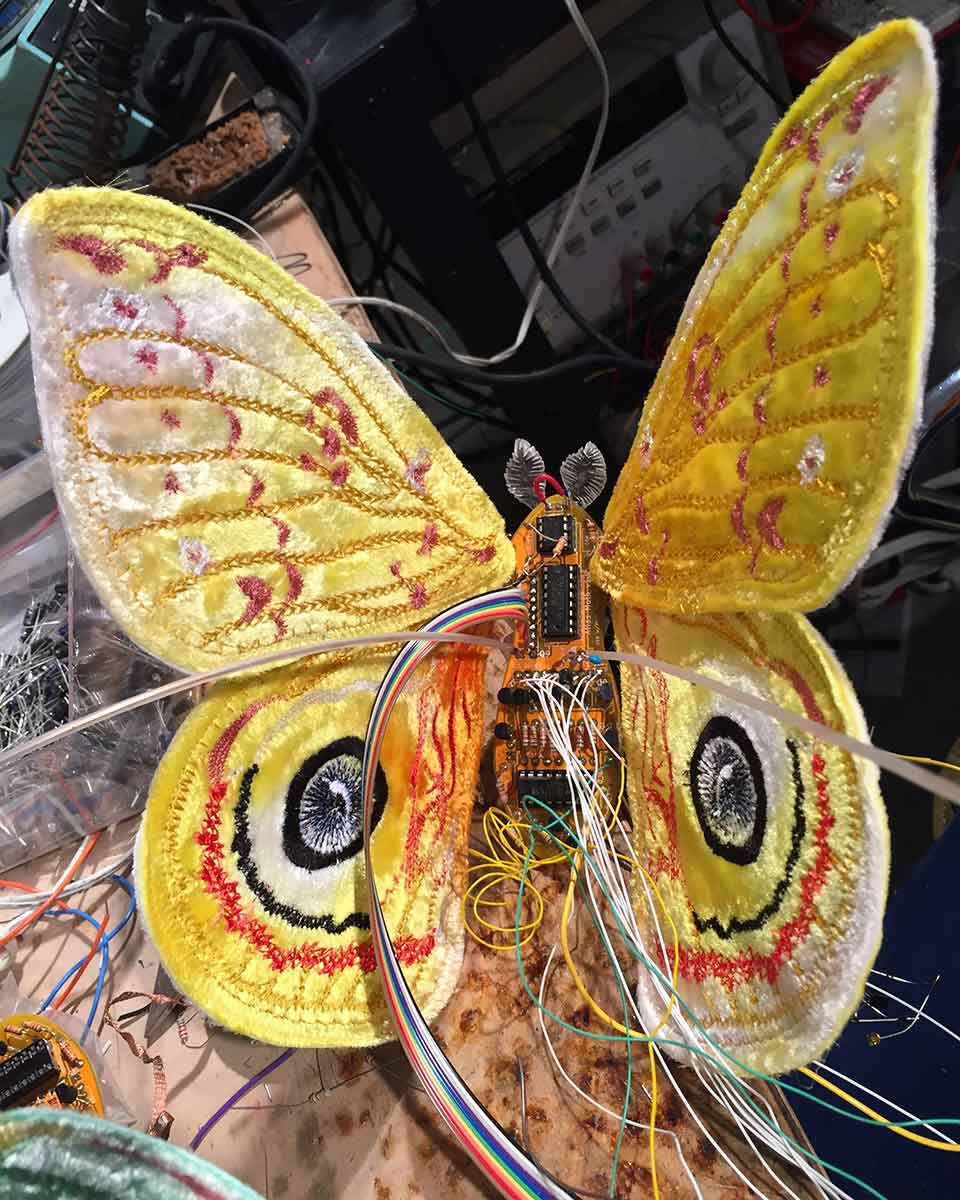


I've been making moth trails in the form of animated light. To learn more, please follow the links below.
https://hackaday.io/…/163201-electronic…/log/161522-moth-bus
electronic sculpture /
I've built artistic electronics for years, but when Hackaday’s Circuit Sculpture Contest came along, I took it as an opportunity to build a purely sculptural circuit. I was intrigued by the challenge to ditch all forms of 2D and go completely freeform. (Incidentally, non-traditional planes for embedding electronics, like paper and canvas, are a great way to make electrified paintings. Totally freeform circuitry is an eccentric labor of love... but then again, so are all forms of art.)
Here's what I ended up making for the contest, a mama bird with her baby in a nest:

Mama Bird with Baby, 2018. Analog electronics and wooden branch
Disclaimer: the branch is wood, but I had to put the nest on something... and I preferred the contrast of a natural material over a piece of wire. I could have put them on a big electrical transformer, like some birds do for reasons I can't understand, but I didn't have a transformer handy.
However, I do own loads of surplus resistors in different colors, collected over the years, which I use to create mosaic effects in my art. If you want a similar aesthetic, don't buy new resistors -- get some old surplus components and/or unsorted resistors for cheap. You can always measure them (and combine them in series or parallel) if you want to use them in a functional circuit.
The shape of the mama bird is made entirely out of resistors and she's hollow inside, which is where I carefully, painstakingly installed her freeform singing circuit. The baby bird is nestled in a nest of wires --not altogether different from the real thing-- and the light-colored object in the nest is an 8 ohm speaker wrapped in heat-shrink tubing (to mechanically dampen the sound). Both birds have a photoresistor that enables you to interactively affect their chirping. Here's a video showing the pair making their avian sounds:
I used a small segmented display to visualize the baby bird's yapping beak. I love how it "shuts up" when you wave your hand in front of the photoresistor. I have uploaded my baby bird schematic to my project page on Hackaday.io so you can check out how I achieved this effect using discrete hardware components.
The mama bird's form was time-consuming and required two types of jig. First, and most importantly, the overall shape of her body: it's very hard to create a complex shape from hundreds or thousands of resistors without some guidance, especially because wires are prone to deform and collapse inward on a volume. After some experimentation, I discovered that regular modeling clay is a great substrate around which to form and solder electronics. Don't use plasticine clay - it will melt if you solder near it.
Below are a series of photographs showing how I made the shape of the mama bird:

First, I modeled her rough form in clay. The volumetric proportions must be accurate, but the details don't matter -- you'll use needle nose pliers to shape the final touches when your wire sculpture is nearly complete. Don't cut corners on the basic volumetric form or else your fundamental proportions will be wrong, and that's hard to fix.
Next, I arranged resistors on the surface of the clay form and soldered them with the aid of a jig (more details on the second jig in a moment). Press the resistors into the clay to hold them steady. Natural clay is a great substrate onto which to solder, assuming it's not too wet and mushy. Don't worry about getting your resistors dirty, because you can wash the sculpture gently before you add active components (just leave time to dry if you plan to use the sculptural resistors as part of a functional circuit).

I played around with different patterns to define regions with texture as well as color.
As you go along, leave yourself an opening to remove the "resistor shell" from the clay form. I left a seam along one side, underneath the bird's wing, where it would not be visible in the final piece. I also used this seam to insert the functional electronics inside.
Now for the second jig: if you try to solder together a bunch of resistors (or whatever) lying freely on your bench, they are prone to move. That's another great application of modeling clay: see the small blob sitting on my bench to the right of the bird? I used it repeatedly to hold resistors in a pattern so that I could shape and solder them. Clay is a really great way to hold parts in place. Mash it into whatever form you need.

So that's how I made the form of the mama bird. It took me several days. Each night I would remove the clay form from the wireframe and store it in a sealed plastic bag (so it wouldn't dry out). If you keep the clay damp, you can reuse it indefinitely.
Below is a photo after I finished sculpting the mama bird on the clay jig and opened her along the seam to insert the functional electronics. (Her circuit was based on a bicore design by Wilf Rigter).

Unfortunately, it's hard to see what's going on with so much complexity... but if you look along the underside of the wing you can see a horizontal opening that runs from the base of her belly to the tip of her beak. I left several longer, unsoldered leads along both edges of the seam so I could twist them shut without soldering (in the inevitable case that she needs to be opened for repair).
An interesting side note on making a complex sculpture out of linear electronic components: remember Thevenin's equivalent? Find any two points on the resistor network, measure them with your multimeter, and voila -- you have a resistor of known value at your disposal. I didn't end up tapping into her body for resistance, but I certainly could have done this (and probably will on future projects). I did insert the photoresistor into her head though, like the third eye that bird's reportedly use for long-range navigation. You can see a detail of that below.

Thanks for reading! Ciao for now
Mexican Birds /
I've been remiss in my project documentation since returning from Mexico's Yucatan peninsula (and end-of-year distractions).
This post revisits the bird studies that I built during my time at Tortuga Escondida near Akumal, Mexico. For my residency, I took a miniature version of my electronics workbench with me for five weeks of study in the jungle, where hacking supplies are not only unavailable but subject to failure due to fluctuating voltages, high humidity, sporadic connectivity, jungle wildlife, and mischievous Mayan spirits called "Aluxes." Electricity really is different in the rural Yucatan than most modernized parts of the United States. It was a fascinating albeit frustrating experience to build delicate circuits in such an uncertain environment, especially after my oscilloscope died from any number of mysterious causes. I'm not complaining, though -- it was one of the most memorable experiences of my life and gave me new appreciation for the complex relationships between electricity, nature, and culture. When I left, I donated my electronic supplies to the Akumal community center, hopefully inspiring some intrepid hackers in the pueblo. I plan to return.
Back to my birds. I brought with me several printed schematics and data sheets as a point of departure, and these proved invaluable given my lack of a printer onsite (and unreliable Internet access). The schematics were all different strategies to produce simple, bird-like chirping sounds for novelty (like a doorbell that sounds like a squawking parrot). Here's an abbreviated list of the circuits that I tried during my time down there:
Wilf's Bird Sound Generator. This BEAM circuit is an ingenious use of a hex inverter chip with effects that are fun to play with due to feedback. I built several different bird sounds with this as the basis, including my recent "singing mama" bird.
Parrot Sound Generator. There are multiple circuits included on this page, but the parrot sound generator was the only one that really intrigued me. It uses a center-tapped transformer as well as an inductor (or one side of a second transformer) to create a chirping sound thanks to some cool physics. All circuits are thanks to physics, but here it's really obvious because you're basically listening to electricity flow through a coil. The easiest component to use for the non-center tapped coil is an inductor. Out of curiosity, I tested an old transformer that I found in Mexico and the results were intriguing. As you would imagine, it sounds "big" as compared with a smaller inductor.
Bird chirp sound generator. This is the same principle as the previous parrot sound generator, but with a slightly different configuration. If you're curious about how the transformer and transistor work together to create sound, build both circuits -- it helps to have more than one view on the same principle. Here's video of this circuit in a piece I made years ago called "Restless Bird Chatters, Still Bird" (2018):
Two canaries singing in a cage. This is a more complicated circuit, but you do get two birds for your effort (albeit similar sounding). Is it worth it? The jury is still out for me. I used it to create my piece "Bird Study #1 (Tortuga Escondida)" (2018) but to be fair, the circuit got messed up when I soldered it (with my crappy soldering iron--never use a crappy soldering iron when you have a better option). So the following video is not a good demonstration of the circuit’s proper effect. In fact, it's barely recognizable due to design changes and errors, but it's the basis for this piece:

Bird Study #1 (Tortuga Escondida), 2018. Analog electronics and watercolor on paper with custom wood frame
I like the painting. Incidentally, people often ask me whether my nature studies are associated with particular species of animals (in the above case, a Dot-winged Antwren and Hooded Oriole). Of course I want my circuits to sound exactly like a species, but this almost never happens. I start with a sound and tweak it until I generate audio that is as close as possible to my subject, often chancing upon a circuit that sounds entirely different than what I originally intended, and then I paint (or sculpt) whatever noise-making creature seems most appropriate to my creative process. I'm principally an artist, not a scientist. Is that a cop out for my inadequate engineering skills? Um, yes. But I would never build any electronic artworks if I held myself to a triple standard of artistic, electronic, and biological accuracy. I try to achieve this trifecta with every piece, but my works often fail to recreate nature faithfully. I don't consider this an artistic failure, though, because the effort to mimic nature is really hard. That's in large part what my work intentionally reveals: the difficulty to mimic lifeforms using manmade media --a timely lesson for our civilization as we separate from nature and try to build our own reality. (I regularly think about Icarus trying to fly to the sun.)
I conclude this entry with the second work that I created while in Mexico, which is a diptych.
The sounds you hear in my Mexican orioles piece are some combination of the circuits that I have described in this post (with tweaks but no significant departures). What I really wanted to capture is the crazy, chaotic chattering of birds that I often heard in the jungle surrounding my residence center. Birds can be really loud in Quintana Roo, like a raucous family at a gathering in which everyone talks all at once and increases their volume trying to be heard. I captured only a fraction of the real experience, which is a great excuse to return and keep trying.
Sitting here in Virginia, on a January day with a cold winter landscape, I definitely want to return to the incredibly energetic, diverse, and otherworldly creatures of Mexico.

Mexican Orioles, 2018. Diptych of analog electronics and watercolor on paper with custom wood frames.
+ Electrolier Virginia + packing for Mexico /


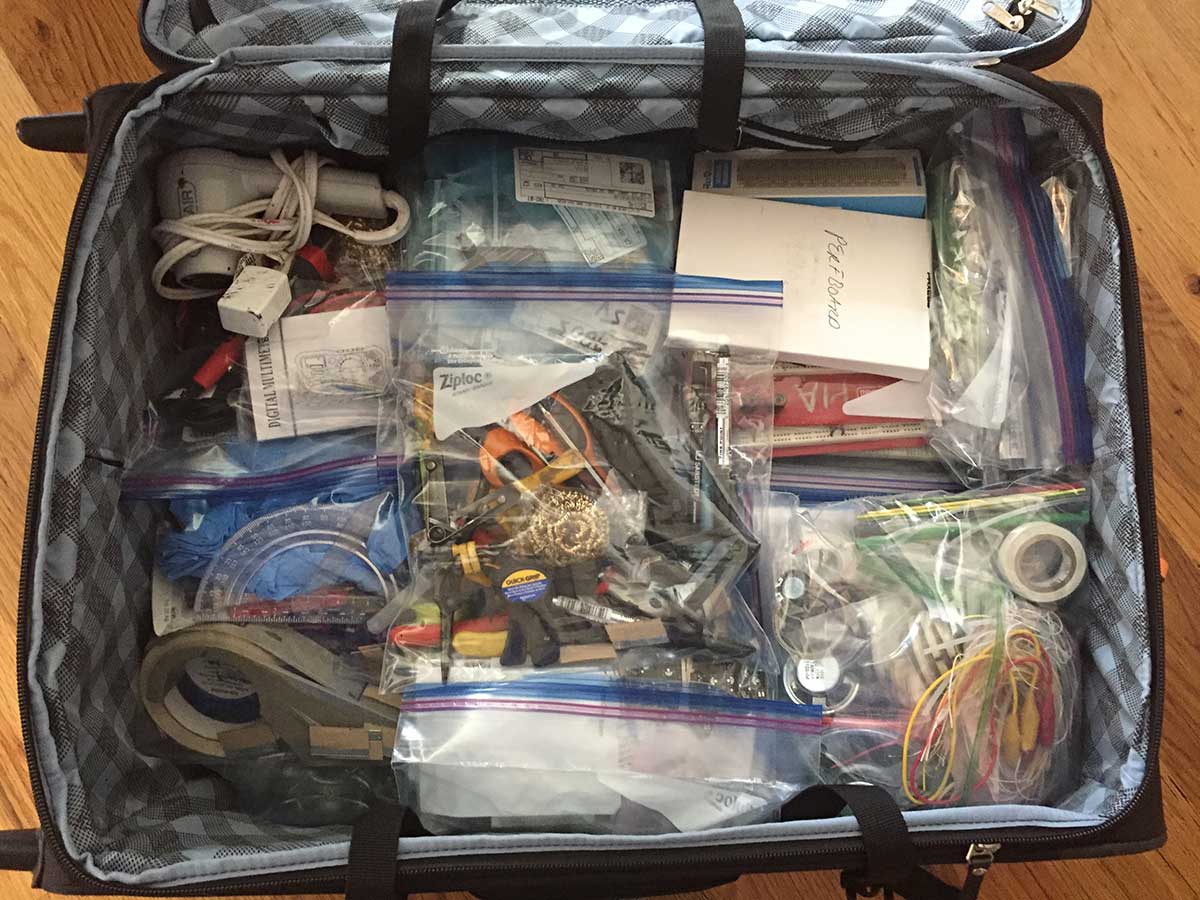
It’s been a marathon recently… just finished “Electrolier (September night in Virginia),” submitted by files for the 2018 Hackaday Prize, and now I’m packing for Mexico. Stay tuned for updates from the jungle of Quintana Roo!
Mother Nature in perfboard /
I've been busy migrating my "Mother Nature" controller circuit out of my breadboard and into perfboard... and yes, it's insane but no, I don't have time to produce a printed circuit board because I'm leaving in six days for a fellowship in Mexico. For the record, I do not recommend soldering so many components and connections in perfboard because the risk of error is high, either from bad solder joints, signal interference, or just plain confusion. I plan to design a printed circuit board for future embodiments of Mother Nature. Stay tuned.
As you can see in my previous log, I'm surrounding my perfboard circuits with spray painted cardboard to make them look cool -- and by the way, you could use this quick-and-dirty strategy to make a "starving artist's badge" for the Hackday Superconference.

As for the design of my "Mother Nature Board," aka random pulse generator to trigger various events, I have some additional technical tips to share:
Don't have logic ICs on hand? Build discrete transistor gates. This approach has the advantage of common components (NPN transistors, resistors, diodes) and you can add multiple inputs to the same gate -- which is useful if you discover that an event is triggering too often... just add another input to the gate and the outcome will become less frequent. Not triggering often enough? Remove or change an input to the gate. You can even tie an input to ground (or power) and let the other fluctuate. I use 2N3904 transistors for as many things as possible, but you could also build these cool light gates described by @Dr. Cockroach

There's a limit to how many things you can drive directly with a signal such as the output of a logic gate. Good engineers read data sheets and calculate voltages and current at various locations in their circuit. Impatient engineers add a generic common emitter amplifier between the signal OUT from a logic device and the signal IN to whatever you're driving. This hand-waving approach to buffering will not work in all cases! But it will probably work for most slow logic applications where you want to transform a signal multiple times and drive some light loads. I'm an artist who prefers prototyping to math, so I work a lot with "try it and see" circuit design. Plus, I am not building a nuclear reactor. Note that a common emitter amplifier will invert your signal. Pay attention to whether you need your signal to be active high or active low. Note that a 555 timer in monostable aka one-shot configuration is looking for an active low input. If necessary, invert the signal again to get what you need.

Mosfets make great electrical "on/off" switches because they don't draw current on their gate (==the mosfet equivalent of a transistor's base). They just need a voltage. I use mosfets for the last step in my Mother Nature circuit, or the point at which I want to turn power on or off to a particular sound circuit (the load). Make sure you have a gate resistor to ground or voltage will "sit" on the gate even when the signal is low (and the mosfet won't turn off).

I hope these tips are helpful. To end this log, I give you a video showing my Mother Nature circuit in perfboard with two sound circuits hooked up. If you watch the LEDs carefully, you will see how certain combinations of logic are triggering the sound circuits. The cricket is wired up to chirp most of the time, whereas the Katydid is triggered less frequently. For this demo, I hooked up only two sound circuits because it's already hard to understand what is happening, and more circuits becomes a sort of natural chaos... which is my goal, as you will see in forthcoming logs.